Pokazywanie postów oznaczonych etykietą RPI. Pokaż wszystkie posty

środa, 19 lutego 2020

Control Sony Bravia TV with openHAB 2.5 through Google Home

Here is how i control power on and off my sony bravia tv :)

1. Download two files (print_ircc_codes.sh; send_command.sh) from:
https://github.com/breunigs/bravia-auth-and-remote
and save them in /home/pi folder with attributes 0755.

2. Set your tv like in readme.md:

  • Navigate to: [Settings] → [Network] → [Home Network Setup] → [IP Control]
  • Set [Authentication] to [Normal and Pre-Shared Key]
  • There should be a new menu entry [Pre-Shared Key]. Set it to 0000. If you choose anything else, you need to change the PSK in the send_command.sh script.


3. Run this command to check control codes of your tv.
(of course with your tv ip)
print_ircc_codes.sh 192.168.8.120
4. Now create openhab files openHAB:
(of course edit tv codes)

sony.items
Switch TV "Bravia TV" { ga="Switch" }

sony.sitemap
sitemap default label="Dom"
{
Switch item=TV label="Bravia TV" mappings=[ "ON"="ON", "OFF"="OFF" ]
}

sony.rules
rule "TV ON"
when
Item TV received command ON or
Item TV changed from OFF to ON
then
executeCommandLine("/home/pi/send_command.sh 192.168.8.120 AAAAAQAAAAEAAAAuAw== sony")
end

rule "TV OFF"
when
Item TV received command OFF or
Item TV changed from ON to OFF
then
executeCommandLine("/home/pi/send_command.sh 192.168.8.120 AAAAAQAAAAEAAAAvAw== sony")
end

poniedziałek, 17 lutego 2020

Setup openHAB 2.5 + Mosquitto MQTT + SONOFF ESPurna + Google Home

Since gbridge.io is shutting down i needed to move to different platform.
openHAB cloud started to be stable so it's good time to move my smart home to it.

This is fast tutorial and does not explains everything exactly, serves only to facilitate the work of a person who knows a little about it :)

1. First install Mosquitto server on your raspberry. It's way more stable than openHAB Moquette broker.
sudo apt-get install mosquitto mosquitto-clients
2. Then install newest stable openHAB
wget -qO - 'https://bintray.com/user/downloadSubjectPublicKey?username=openhab' | sudo apt-key add -
sudo apt-get install apt-transport-https

echo 'deb https://dl.bintray.com/openhab/apt-repo2 stable main' | sudo tee /etc/apt/sources.list.d/openhab2.list

sudo apt-get update
sudo apt-get install openhab2

sudo systemctl start openhab2.service
sudo systemctl status openhab2.service

sudo systemctl daemon-reload
sudo systemctl enable openhab2.service
3. In openHAB install MQTT Binding addon and openHAB Cloud Connector

4. Create config files for your SONOFF's:
(off course with your mqtt names)

/etc/openhab2/items/default.items
Switch BedTV "Bed TV" { channel="mqtt:topic:BedTV:switch", ga="Outlet"}
Switch BedLight "Bed Light" { channel="mqtt:topic:BedLight:switch", ga="Light"}

/etc/openhab2/sitemap/default.sitemap
sitemap default label="Dom"
{
     Switch item=BedTV label="Bed TV"
     Switch item=BedLight label="Bed Light"
}

/etc/openhab2/things/default.things
Bridge mqtt:broker:myUnsecureBroker "Mosquitto MQTT Broker" [ host="localhost", secure=false ]
{
     // Bed TV
     Thing mqtt:topic:BedTV "Bed TV" {
          Channels:
          Type switch : switch "Power Switch" [
          stateTopic="ESPURNA-Bed-TV/relay/0",
          commandTopic="ESPURNA-Bed-TV/relay/0/set",
          on="1",
          off="0"
          ]
     } 
     // Bed Light
     Thing mqtt:topic:BedLight "Bed Light" {
          Channels:
          Type switch : switch "Power Switch" [
          stateTopic="ESPURNA-Bed-Light/relay/0",
          commandTopic="ESPURNA-Bed-Light/relay/0/set",
          on="1",
          off="0"
          ]     }
}

5. Configure your SONOFF ESPurna to connect to your MQTT Mosquitto server.
(i like ESPurna soft becouse for me it's way more stable that Tasmota)
6. Configure openHAB Cloud Connector
cat /var/lib/openhab2/uuid ; echo
cat /var/lib/openhab2/openhabcloud/secret ; echo

6.1 Create account with this data on https://myopenhab.org/

6.2 Add openHAB on your phone in your google assistant.


czwartek, 7 lutego 2019

gbridge.io with Tasmota or ESPURNA and Mosquitto Bridge on Raspberry

Oto poradnik jak skonfigurować usługę gbridge.io by działała z przełącznikim SONOFF z wgranym TASMOTA albo ESPURNA z wykorzystaniem serwera bramki MQTT na raspberry.
gbridge.io pozwala na podłączenie urządzeń które obsługują MQTT np. SONOFF do google home.

1. Install Mosquito newest version on your RPI:

sudo apt update 
sudo apt install -y mosquitto mosquitto-clients 
sudo systemctl enable mosquitto.service

2. Edit /etc/mosquitto/mosquitto.conf adding at the end:

TASMOTA
connection gbridge-io
address mqtt.gbridge.io:8883
bridge_attempt_unsubscribe true
bridge_protocol_version mqttv311
cleansession true
remote_username {gbridge-mqtt-username}
remote_password {gbridge-mqtt-password}
remote_clientid gbridge-u{userid}-{randomstring}
topic gBridge/u{uid}/cmnd/+/power both 0 "" ""
topic gBridge/u{uid}/stat/+/POWER both 0 "" ""
bridge_capath /etc/ssl/certs/
bridge_tls_version tlsv1.2

ESPURNA
connection gbridge-io
address mqtt.gbridge.io:8883
bridge_attempt_unsubscribe true
bridge_protocol_version mqttv31
cleansession true
remote_username {gbridge-mqtt-username}
remote_password {gbridge-mqtt-password}
remote_clientid gbridge-u{userid}-{randomstring}
topic gBridge/u{uid}/+/relay/0/set both 0 "" ""
topic gBridge/u{uid}/+/status both 0 "" ""
bridge_capath /etc/ssl/certs/
bridge_tls_version tlsv1.2
3. Reboot Mosquitto
sudo /etc/init.d/mosquitto restart
4. Configure MQTT settings

TASMOTA


ESPURNA

4. Add Device on https://gbridge.kappelt.net/device


TASMOTA

ESPURNA
5. Connect gbridge.io with your google home and it's done :)

niedziela, 20 grudnia 2015

Czujniki temperatury DS18B20 + Ekran Hitachi HD44780 LCD 16x2 na Raspberry PI #Updated


Opis podłączenia ekranu HD44780 i 2 czujników DS18B20 do maliny. Wszystko pochodzi z 3 stron podanych na samym dole, z własnego doświadczenia dodałem tylko rezystor 4k(moze być też mniejszy) na kontraście od lcd oraz zmieniłem troche kod programu aby wyświetlał temeperaturę z 2 czujników.

Instalujemy kilka  rzeczy:


sudo apt-get install python-dev
sudo apt-get install python-setuptools
sudo apt-get install screen
sudo apt-get install python-pip
sudo pip install rpi.gpio
git clone https://github.com/adafruit/Adafruit-Raspberry-Pi-Python-Code.git

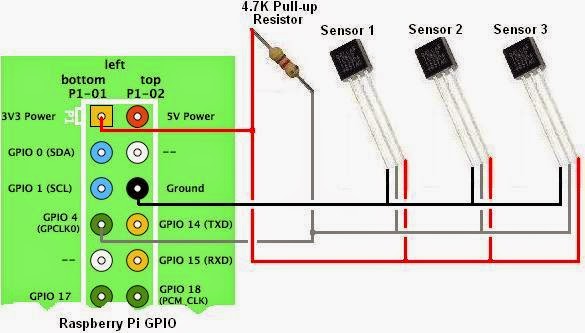
Tak podłączamy czujniki ds18b20 do GPIO:


Edytujemy plik w celu automatycznego ładowania sensorów przy każdym uruchomieniu:
sudo nano /etc/modules
w1-gpio
w1-therm
Odczytujemy identyfikatory naszych czujników które wykorzystamy w końcowym programie:
ls -l /sys/devices/w1_bus_master1/
Dodajemy na początku pliku /boot/config.txt:
sudo nano /boot/config.txt
dtoverlay=w1-gpio,gpiopin=4
sudo reboot

Tak podłączamy lcd do GPIO:
LCD Pin Function Pi Function Pi Pin
01 GND GND 06
02 +5V +5V 02
03 Contrast przez ok. 4kohm GND 06
04 RS GPIO7 26
05 RW GND 06
06 E GPIO8 24
07 Data 0

08 Data 1

09 Data 2

10 Data 3

11 Data 4 GPIO25 22
12 Data 5 GPIO24 18
13 Data 6 GPIO23 16
14 Data 7 GPIO27 13
15 +5V przez ok. 560ohm     +5V 02
16 GND GND 06


Tworzymy nowy plik CharLCD_Temp.py w /Adafruit-Raspberry-Pi-Python-Code/Adafruit_CharLCD
#!/usr/bin/python
from Adafruit_CharLCD import Adafruit_CharLCD
from subprocess import *
from time import sleep, strftime
from datetime import datetime

lcd = Adafruit_CharLCD(pin_rs=7, pin_e=8, pins_db=[25, 24, 23, 27], GPIO=None)
file = "/sys/bus/w1/devices/28-0000063dd97c/w1_slave"
file1 = "/sys/bus/w1/devices/28-0000063d7619/w1_slave"
lcd.begin(16,1)

def get_temp(file):

#Open file written to by temp sensor
        tfile = open(file)

#read all text in file
        text = tfile.read()

#Close file once text is read
        tfile.close()

#pull out the temperature value
        temperaturedata = text.split("\n")[1].split(" ")[9]

# The first two characters are "t=", so get rid of those and convert the temperature $
        temperature = float(temperaturedata[2:])

# Put the decimal point in the right place and display it.
        temperature = temperature / 1000
        temperature = round(temperature, 1)
        return temperature
       
def get_temp1(file1):

#Open file written to by temp sensor
        tfile1 = open(file1)
#read all text in file
        text1 = tfile1.read()

#Close file once text is read
        tfile1.close()

#pull out the temperature value
        temperaturedata1 = text1.split("\n")[1].split(" ")[9]
       
# The first two characters are "t=", so get rid of those and convert the temperature $
        temperature1 = float(temperaturedata1[2:])
       
# Put the decimal point in the right place and display it.
        temperature1 = temperature1 / 1000
        temperature1 = round(temperature1, 1)
        return temperature1

while 1:
    lcd.clear()
    tempVal = get_temp(file)
    tempVal1 = get_temp1(file1)   
    lcd.message(datetime.now().strftime('%a  %d  %b  %y\n'))
    lcd.message(datetime.now().strftime('    %H:%M:%S'))
    sleep(30)
    lcd.clear()
    lcd.message('TEMP ZEW %s C\n' % ( tempVal ) )
    lcd.message('TEMP WEW %s C' % ( tempVal1 ) )
    sleep(30)
Program odpalamy przez komendę:
./CharLCD_Temp.py
Auto odpalanie przy starcie systemu: 
sudo nano boot.sh
sleep 15s
python /home/pi/Adafruit-Raspberry-Pi-Python-Code/Adafruit_CharLCD/CharLCD_Temp.py &
chmod 755 boot.sh
sudo nano /etc/rc.local     i dodajemy przed exit 0:
/home/pi/boot.sh &


A oto rezultat:
i po 30 sekundach:

Update 20.12.2015
Oto trochę zmodyfikowany skrypt, Temperaturę zewnętrzną pobiera z api Forecast(https://developer.forecast.io/). Wszystko teraz wyświetla się na jednym ekranie odświeżając zegar co minutę a pogodę co 2 minuty. Dodatkowo nazwy miesięcy są wyświetlane po polsku. Pojawił się również znak stopnia Celsjusza.

#!/usr/bin/python
from Adafruit_CharLCD import Adafruit_CharLCD
from subprocess import *
from time import sleep, strftime
from datetime import datetime
import locale

import json
import urllib

locale.setlocale(locale.LC_TIME, "pl_PL.ISO-8859-2")
lcd = Adafruit_CharLCD(pin_rs=7, pin_e=8, pins_db=[25, 24, 23, 18], GPIO=None)
file = "/sys/bus/w1/devices/28-0000063dd97c/w1_slave"

lcd.begin(16,1)

def get_temp(file):
tfile = open(file)
text = tfile.read()
tfile.close()
temperaturedata = text.split("\n")[1].split(" ")[9]
temperature = float(temperaturedata[2:])
temperature = temperature / 1000
temperature = round(temperature, 1)
return temperature

while 1:
lcd.clear()
tempVal = get_temp(file)
apikey="XXXXXXXXXXXXXXXXXXXXXXXXXXXXXXXXXXX"
lati="XX.XXXXXX"
longi="XX.XXXXXX"
url="https://api.forecast.io/forecast/"+apikey+"/"+lati+","+longi+"?units=si"
meteo=urllib.urlopen(url).read()
meteo = meteo.decode('utf-8')
weather = json.loads(meteo)
weather2 = round(weather['currently']['temperature'], 1)
lcd.message(datetime.now().strftime('%d %b     %H:%M\n'))
lcd.message("z%s" % str(weather2)+chr(223)+"C"+" w%s" % (tempVal)+chr(223)+"C")
sleep(60)
lcd.clear()
lcd.message(datetime.now().strftime('%d %b     %H:%M\n'))
lcd.message("z%s" % str(weather2)+chr(223)+"C"+" w%s" % (tempVal)+chr(223)+"C")
sleep(60)    
A oto nowy rezultat:


Źródło:
http://www.raspberrypi-spy.co.uk/2012/07/16x2-lcd-module-control-using-python/
https://pel.ly/raspberry-pi-lcd-screen-and-temperature-sensor/
https://github.com/adafruit/Adafruit-Raspberry-Pi-Python-Code/tree/master/Adafruit_CharLCD

piątek, 4 grudnia 2015

Instalacja i konfiguracja serwera wydruków CUPS na Raspberry Pi2 z użyciem drukarki SAMSUNG.

Prosta i szybka metoda na podłączanie drukarki nie mającej wifi do sieci z użyciem raspberry pi i CUPS.

Instalacja CUPS

  1. Oczywiście podpinamy drukarkę kablem USB do maliny
  2. Instalujemy CUPS przez terminal:
  3. sudo apt-get install cups
  4. Dodajemy naszego uzytkownika pi do grupy administratorskiej stworzonej przez CUPS:
  5. sudo usermod -a -G lpadmin pi
  6. Musimy edytować jeszcze config naszego serwera wydruku. A więc::
  7. sudo nano /etc/cups/cupsd.conf
  8. Zmieniamy wpisy tak jak pogrubione poniżej:
    # Only listen for connections from the local machine
    # Listen localhost:631
    Port 631

    < Location / >
    # Restrict access to the server...
    Order allow,deny
    Allow @local
    < /Location >

    < Location /admin >
    # Restrict access to the admin pages...
    Order allow,deny
    Allow @local
    < /Location >

    < Location /admin/conf >
    AuthType Default
    Require user @SYSTEM
    # Restrict access to the configuration files...
    Order allow,deny
    Allow @local
    < /Location >
  9. Restartujemy usługę:
    sudo /etc/init.d/cups restart

Instalacja sterowników(SAMSUNG)

  1. Pobieramy sterowniki do naszej drukarki i je instalujemy.
  2. W moim przypadku jest to samsung więc sterowniki pobieramy z tąd: uld_v1.00.36_00.91.tar.gz
  3. Wypakowujemy i wgrywamy folder z sterownikami uld przez sftp np. programem filezilla do naszego domowego folderu /home/pi/
  4. Nadajemy wszystkim plikom chmod 777
  5. Instalujemy przy pomocy komendy:
    sudo ./install.sh 
  6. Ze względu na brak wspierania armhf dostaniemy masę błędów ale się tym nie przejmujemy. potrzebujemy w sumie tylko plików .ppd które zostaną dodane do naszego systemu.

Konfiguracja CUPS

  1. Przechodzimy na stronę: http://[IP MALINY]:631/admin i klikamy Add Printer
  2. Wybieramy naszą drukarkę i klikamy Continue
  3. Zaznaczamy Share This Printer i klikamy Continue
  4. Wybieramy nasz firmę naszej drukarki i klikamy Continue
  5. Zaznaczamy odpowiedni model i klikamy Add Printer
  6. Teraz możemy wybrać podstawowe ustawienia drukarki i klikamy Set Default Options
  7. Klikamy na nazwę naszej drukarki.
  8. Kopiujemy adres naszej drukarki z przegladarki
  9. Niestety drukarki samsung nie są do końca wspierane i w statusie będzie taki błąd, dodatkowo wydrukowanie testowej strony przez CUPS będzie niemożliwe.
  10. Otwieramy Control Panel na docelowym komputerze w sieci.
  11. Wybieramy Advanced printer setup
  12. Klikamy The printer that I want isn't listed
  13. Wklejamy wcześniej skopiowany adres naszej drukarki. (http a nie https)
  14. I GOTOWE :) Możemy już swobodnie drukować
W kolejnym poradniku dodamy tą drukarkę do konta google i zrobimy cloud printing :)